The Ultimate Easy Vegan Focaccia Bread (No-Knead & Extra Crispy)
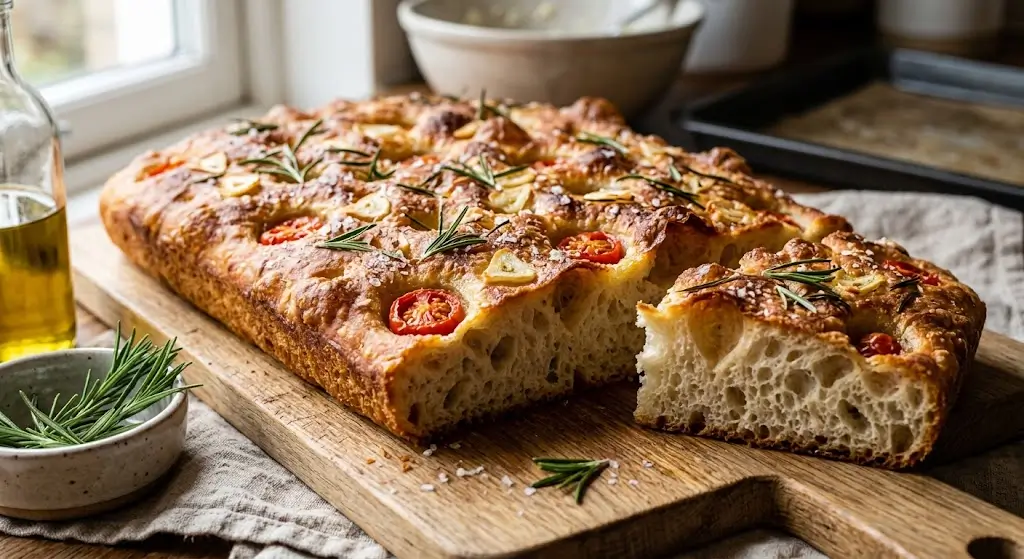
If you have ever believed that baking authentic, bakery-quality bread at home requires hours of tedious kneading, special equipment, or complex techniques, this Easy Vegan Focaccia Bread recipe will permanently change your perspective. With a golden, extra-crispy crust, a remarkably airy interior full of signature bubbles, and rich infusions of extra virgin olive oil, garlic, and fresh rosemary, this plant-based focaccia delivers pure Italian comfort in every bite.
Because traditional focaccia relies on basic staples, it is naturally vegan by default. However, mastering the exact moisture ratio, fermentation time, and baking temperature is what transforms a flat bread into an extraordinary, pillowy masterpiece. Whether you are an experienced plant-based baker or a complete beginner searching for a reliable, foolproof loaf, this step-by-step guide covers everything you need to know.
Why You Will Love This Plant-Based Focaccia Recipe
- 100% Vegan & Dairy-Free: Naturally plant-based with zero butter, milk, or eggs required.
- No-Knead Method: Forget heavy manual labor or stand mixers; the high-hydration dough does all the structural work through simple time and gentle folding.
- Irresistibly Crispy & Airy: Generous extra virgin olive oil fries the bottom crust to perfection while keeping the inside light, bubbly, and fluffy.
- Budget-Friendly Staples: Made with basic pantry ingredients—flour, yeast, water, olive oil, and salt.
- Endlessly Customizable: Perfect canvas for fresh herbs, roasted garlic, cherry tomatoes, olives, or artistic vegetable toppings.
The Science Behind High-Hydration Focaccia
Understanding how high-hydration dough works is the key to mastering focaccia. This recipe uses an 80% to 85% hydration ratio (meaning water weight is 80–85% relative to flour weight).
When flour absorbs a large amount of water, gluten networks form naturally over time without aggressive kneading. During the overnight resting period in the refrigerator, yeast slowly feeds on sugars in the flour, releasing carbon dioxide gas. These trapped gas pockets expand rapidly under high oven heat, creating the iconic large air bubbles and light, open crumb texture that distinguishes premium artisan focaccia from dense breads.
Ingredients You Will Need
To achieve the best flavor and texture, quality ingredients matter immensely. Here is what you need:
For the Dough:
- Bread Flour (400g / approx. 3 ¼ cups): High protein content (12–14%) creates a strong gluten structure capable of holding air bubbles and delivering a pleasantly chewy crumb. Substitute: Unbleached All-Purpose Flour works well for a softer texture.
- Warm Water (330ml / approx. 1 ⅓ cups): Temperature should be around 105°F–110°F (40°C). Too hot will kill the yeast; too cold will slow activation.
- Instant Yeast (7g / 1 packet or 2 ¼ tsp): Allows quick, reliable rising. Active dry yeast can also be used (dissolve in warm water with a pinch of sugar first).
- Fine Sea Salt (8g / 1 ½ tsp): Strengthens gluten and regulates yeast activity while enhancing wheat flavors.
- Maple Syrup or Organic Sugar (1 tsp): Provides immediate food for the yeast to accelerate activation (optional but recommended).
For the Pan & Toppings:
- Extra Virgin Olive Oil (60ml / ¼ cup, divided): The star ingredient. High-quality cold-pressed olive oil imparts rich flavor and creates the fried, crispy bottom crust.
- Flaky Sea Salt (Maldon or coarse sea salt): Essential for sprinkling on top before baking.
- Fresh Rosemary (2–3 sprigs): Strip the leaves and soak them briefly in olive oil so they do not burn during baking.
- Fresh Garlic (2 cloves, thinly sliced or minced): Optional, for rich garlic-infused focaccia.
Step-By-Step Instructions
Step 1: Activate Yeast and Mix the Dough
In a large glass or ceramic mixing bowl, combine the warm water, maple syrup (or sugar), and instant yeast. Whisk gently and let sit for 5 minutes until slight bubbles or foam form on the surface.
Add the bread flour and fine sea salt to the liquid mixture. Using a sturdy silicone spatula or wooden spoon, mix vigorously until all dry flour is fully incorporated. The dough will look very wet, sticky, and shaggy—this is completely normal. Do not add extra flour.
Step 2: Perform Stretch-and-Folds
Cover the bowl with a damp kitchen towel or plastic wrap and let it sit at room temperature for 30 minutes.
After 30 minutes, wet your hands with water to prevent sticking. Reach down to the bottom edge of the dough, gently lift one side upward, and stretch it over the center of the dough mass. Rotate the bowl 90 degrees and repeat this lifting and stretching motion 4 times around the entire bowl.
Cover the bowl again and let it rest for another 30 minutes. Repeat the stretch-and-fold process one more time. You will notice the dough becoming smoother, stronger, and more elastic.
Step 3: Cold Fermentation (Overnight for Best Results)
At this stage, you have two choices:
- Overnight Method (Recommended): Drizzle 1 tablespoon of olive oil over the top of the dough, cover tightly with plastic wrap, and place it in the refrigerator for 12 to 24 hours. Cold fermentation drastically improves flavor depth and creates massive air bubbles.
- Same-Day Method: Cover the bowl tightly and leave it at room temperature in a warm spot for 1.5 to 2 hours until it doubles in size and shows visible surface bubbles.
Step 4: Transfer to Pan and Second Rise
Generously coat an 8×12-inch or 9×13-inch metal baking pan with 2 tablespoons of extra virgin olive oil. Metal pans conduct heat much better than glass or ceramic, ensuring a crispier bottom crust.
Gently tip the fermented dough into the prepared baking pan. Do not deflate or stretch the dough forcefully. Gently fold the edges of the dough under itself once to create a rounded shape coated in oil.
Let the dough rise uncovered in a warm, draft-free spot for 2 to 4 hours (if refrigerated overnight) or 1 to 1.5 hours (if room-temp). The dough is ready when it fills the entire pan, looks light, puffed, and jiggles noticeably when you gently shake the pan.
Step 5: Dimple, Top, and Bake
Preheat your oven to 425°F (220°C). Position the rack in the lower-middle section of the oven.
Drizzle the remaining 2 tablespoons of extra virgin olive oil over the entire surface of the puffed dough. Oil your fingertips thoroughly. Press your fingers straight down into the dough until you touch the bottom of the pan. Create deep dimples across the entire surface. You will hear satisfying popping sounds as large air bubbles expand across the top.
Scatter the soaked fresh rosemary leaves, sliced garlic, and a generous sprinkle of flaky sea salt evenly across the dimpled surface.
Place the pan in the preheated oven and bake for 22 to 26 minutes, or until the top is deeply golden brown and the bottom edges are crisp and sizzling in oil.
Step 6: Cool and Serve
Remove the focaccia from the oven. Drizzle a small extra splash of fresh olive oil over the hot crust if desired. Let it cool in the pan for 10 minutes, then carefully transfer it to a wire cooling rack using a spatula. Allowing air to circulate underneath prevents the bottom crust from steaming and losing its crunch.
Slice with a serrated bread knife and enjoy warm!
Flavor Variations & Creative Toppings
While classic garlic and rosemary focaccia is unbeatable, you can easily customize your plant-based focaccia with these popular variations:
- Tomato & Herb Focaccia: Press halved cherry tomatoes and fresh oregano leaves into the dimples prior to baking.
- Caramelized Onion & Olive: Sauté thinly sliced red onions until deeply sweet and browned, then top the dough along with pitted Kalamata olives.
- Focaccia Art (Garden Bread): Arrange sliced bell peppers, red onions, asparagus spears, parsley, and cherry tomatoes to create floral landscape designs on top of the dough before baking.
- Pesto Drizzle: Swirl 3 tablespoons of homemade vegan basil pesto over the surface right after dimpling.
Key Tips for Success
- Use a Metal Baking Pan: Glass or ceramic baking dishes retain moisture and often lead to soggy bottoms. Dark non-stick or aluminum rimmed baking sheets yield the crunchiest texture.
- Do Not Skimp on Olive Oil: Olive oil is not just a greasing agent here; it is an active ingredient that bakes, fries, and moistens the bread.
- Be Patient with the Proofing: If your dough feels cold or tight, give it more time to relax and expand in the pan before dimpling. Cold dough will not produce deep, bubbly dimples.
- Use Flaky Salt: Regular table salt is too fine and harsh. Flaky Maldon salt provides a pleasant crunchy texture and clean salty burst.
Storage & Reheating Instructions
- Room Temperature: Store leftover focaccia in an airtight container or wrapped loosely in foil at room temperature for up to 2 days.
- Freezing: Slice the focaccia into individual squares, place parchment paper between slices, and store in a freezer-safe bag for up to 3 months.
- Reheating: Avoid using the microwave as it makes bread rubbery. Reheat slices in a preheated oven or toaster oven at 375°F (190°C) for 5–8 minutes until warmed through and crisp again.
Frequently Asked Questions (FAQ)
Is focaccia bread naturally vegan?
Yes! Traditional Italian focaccia dough consists solely of flour, water, yeast, olive oil, and salt. It contains no dairy products, butter, or eggs.
Can I make gluten-free vegan focaccia with this recipe?
Standard high-hydration yeast recipes rely heavily on gluten for structure. For a gluten-free version, replace the bread flour with a 1:1 Gluten-Free Baking Flour blend that contains xanthan gum, though the air bubble structure will be somewhat denser.
Why didn’t my focaccia develop air bubbles?
Lack of bubbles usually stems from inactive/expired yeast, insufficient rising time, or over-handling the dough during transfer. Ensure your water is warm (105°F–110°F) and allow the dough ample time to rise until visibly puffy.
Recipe Card Summary
| Prep Time | Fermentation / Proof Time | Bake Time | Total Time | Servings |
| 15 mins | 3–14 hours | 25 mins | ~4–15 hours | 8–10 slices |
Nutritional Highlights (Per Serving):
- Calories: ~210 kcal
- Carbohydrates: 28g
- Protein: 5g
- Healthy Fats: 9g (Monounsaturated from Olive Oil)
- Cholesterol: 0mg